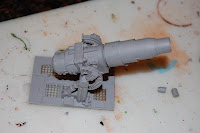
 This is the floor of the Medusa. You have to carefully cut away the resin that fills the gaps. Its a pretty flimsy piece and the material is removed easily enough. Then a piece of etched brass that comes with the kit is glued underneath. The idea is that you will be able to see through the floor to the shells and machinery under the floor.
 From here the supports for the gun are glued down and the medusa barrel is put into place on top. The gun barrel moves a little too freely until it is placed within the gun turret later on.

Finally, for the gun, this shell hatch is glued down. This is the way the crew are supposed to move a shell out from under the floor up to the gun. I must say you can see through the floor pretty well here, and it is what encouraged me to paint up the interior completely. However, the inside of the vehicle is really dark later on and the brass floor makes it hard to see underneath!
 Stay tuned for the rest of the build. Next time We will work on the gun turret.